30 Whale Shark Nail Designs That Are Totally Unique | Polish and Pearls
Why Make This Recipe Whale Shark nail designs are not just about having a fun manicure; they’re a way to express your creativity and love for sea life. These unique designs can bring joy and spark conversation. Plus, they’re perfect for anyone who wants to stand out and showcase their artistic flair. Whether you’re a…
Why Make This Recipe
Whale Shark nail designs are not just about having a fun manicure; they’re a way to express your creativity and love for sea life. These unique designs can bring joy and spark conversation. Plus, they’re perfect for anyone who wants to stand out and showcase their artistic flair. Whether you’re a nail art novice or a seasoned pro, these designs are sure to inspire you!
How to Make Whale Shark Nail Designs
Ingredients:
- Base coat
- Light blue nail polish
- Dark blue nail polish
- White nail polish
- Black nail polish
- Nail art brush
- Dotting tool
- Top coat
Directions:
- Start by applying a base coat to protect your nails.
- Once it’s dry, paint your nails with light blue nail polish as the background color.
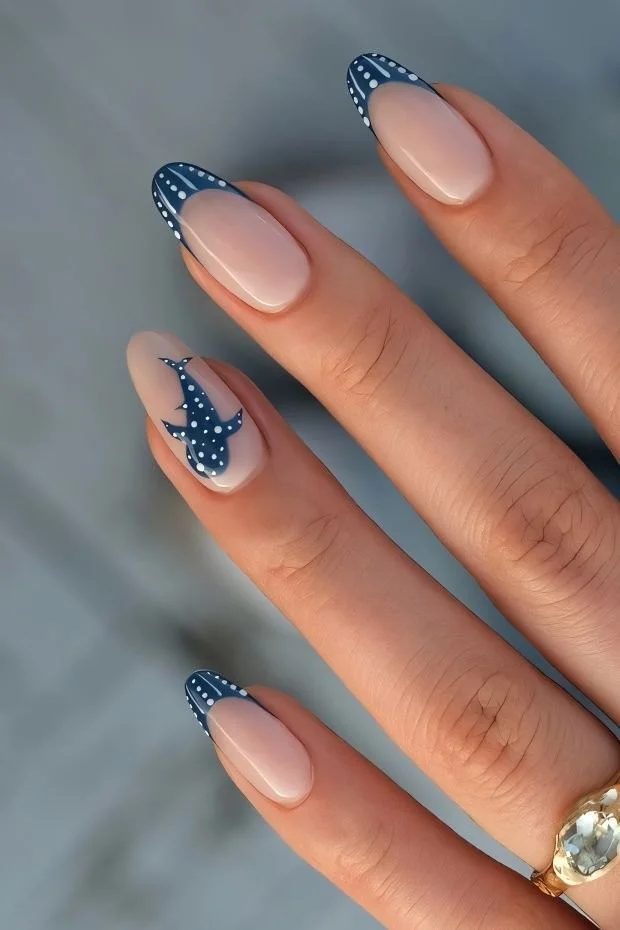
- Using the dark blue nail polish, create the shape of a whale shark on one or two nails.
- For details, use the white nail polish to paint spots on the whale shark’s body. You can also add a few spots on the surrounding nails for a cohesive look.
- With the black nail polish, use the nail art brush to add eyes and a smile to the whale shark.
- Allow everything to dry and finish with a top coat to seal in your design.
How to Serve Whale Shark Nail Designs
Show off your Whale Shark nail designs during special events, parties, or simply while hanging out with friends. They can also be a great conversation starter at the beach or poolside.
How to Store Whale Shark Nail Designs
Since this is a nail art design, there’s no need to "store" it; however, to keep your nails looking great, maintain a good nail care routine. Regularly apply cuticle oil and keep your hands moisturized.
Tips to Make Whale Shark Nail Designs
- Take your time, especially when painting details. Rushing can lead to mistakes.
- Use a steady hand when painting the whale shark shape to ensure it’s recognizable.
- If you don’t have a dotting tool, you can use a toothpick to create dots and other small details.
Variation
You can change the colors for a bold look, like using teal for the base or glitter polish for added sparkle. Why not try a sunset gradient instead of a solid color? The possibilities are endless!
FAQs
1. Can I use gel polish for this design?
Yes! Gel polish works well for a long-lasting finish. Just make sure to follow the curing process as directed.
2. What if I make a mistake?
No worries! Use a small brush and some nail polish remover to clean up any mistakes, or simply add more designs to cover it up.
3. How long will these designs last?
With a good top coat and proper nail care, your Whale Shark designs can last a week or more. Just avoid excessive exposure to water and chemicals to keep them looking fresh!