Gingerbread Nails: 6 Easy Steps to Master This Viral Trend
Create viral gingerbread nails with this 6-step pro guide. Learn gel secrets, tool swaps, and art tips for a stunning, long-lasting manicure.
Introduction
Did you know that searches for “gingerbread nails” spike by over 300% on Pinterest every year between November 1st and December 15th? It’s not just a cute holiday design; it has become a staple of the “cozy luxury” aesthetic dominating social media feeds. With over 4.2 million views on related TikTok hashtags, this look is officially competing with the classic Red Chrome for the top spot this winter.
But here is the statistic that matters most to your wallet: A hand-painted, structured gel manicure featuring intricate art like gingerbread nails currently averages $85 to $120 at high-end salons in major metro areas.
Think you need steady surgeon hands or a professional UV lamp setup to achieve this look? Think again. Whether you are using traditional lacquer or soft gel, the charm of this design lies in its organic, cookie-like texture—perfection is actually the enemy here. In this guide, I’m going to teach you how to master gingerbread nails with the precision of a nail tech, focusing on long-lasting adhesion and the perfect color theory to match your skin tone. Let’s get that fresh-baked look right at your kitchen table.
Essential Supply List
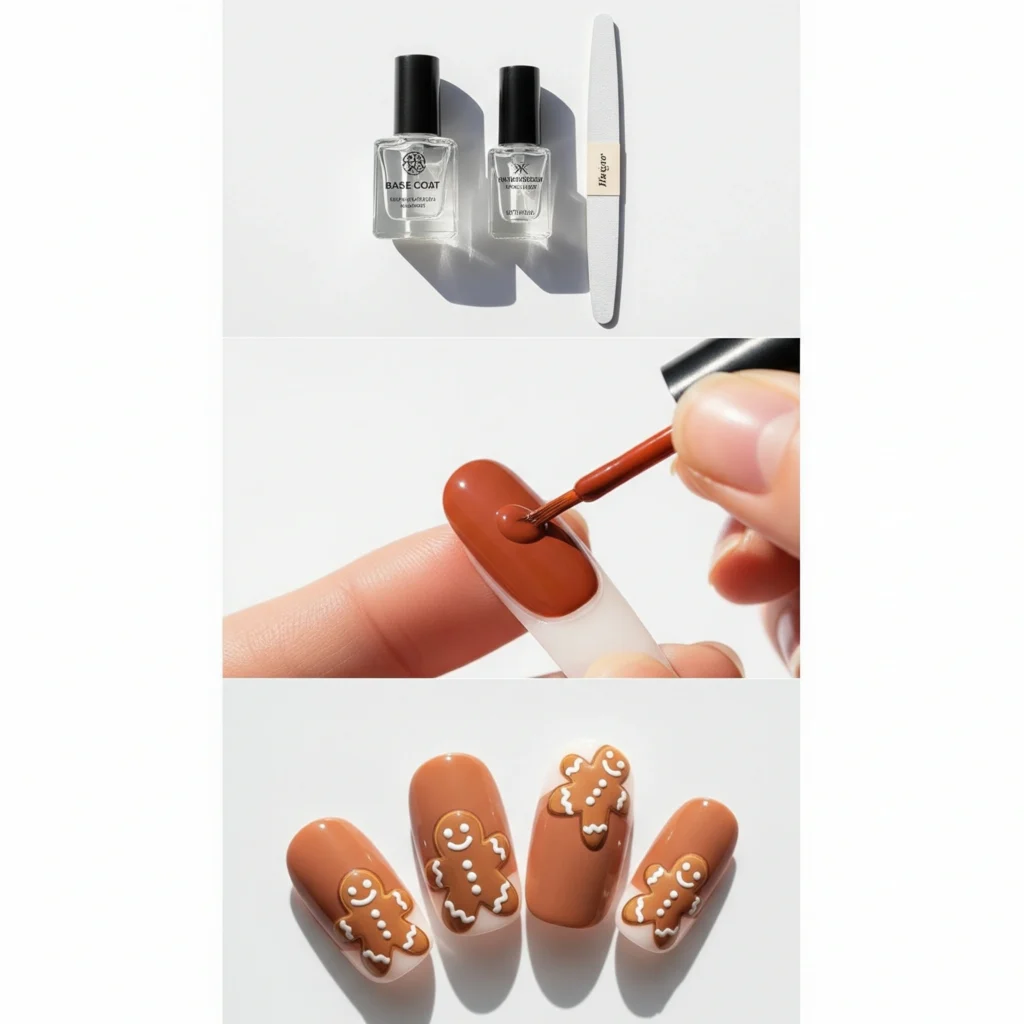
To achieve a professional-grade finish, quality supplies are non-negotiable. However, you don’t need to break the bank. Here is the breakdown of what you need to create gingerbread nails, including professional tools and their DIY alternatives.
The Polishes (Gel or Lacquer):
- Base Coat: Look for a rubber base (if using gel) for better flexibility or a ridge-filling base for lacquer.
- The “Cookie” Base Color: You need a highly pigmented toasted caramel, terracotta, or warm cognac shade.
- Pro Tip: Test the opacity on a piece of paper first. If it’s too sheer, your gingerbread man will look burnt.
- The “Icing” Detailer: A high-viscosity white art gel or a dense white creme polish.
- Accent Colors: Small amounts of black (for eyes) and red or green (for buttons/bowties).
- Top Coat: For the most realistic result, I recommend a matte top coat (it mimics the texture of a baked cookie), but a glossy top coat works for a glazed look.
The Tools:
- Liner Brush: A 7mm or 9mm liner brush is the industry standard for fine lines.
- DIY Swap: If you don’t have a liner brush, clean off an old liquid eyeliner brush. It offers surprising precision.
- Dotting Tool: Essential for buttons and eyes.
- DIY Swap: A bobby pin pulled slightly apart or the tip of a dried ballpoint pen works perfectly.
- Clean-up Brush: An angled brush dipped in acetone/alcohol.
- Dehydrator/Cleanser: 91%+ Isopropyl Alcohol to clean the nail plate.

Time Commitment & Skill Level
Let’s look at the data so you can plan your evening accordingly.
- Total Time: 60–90 minutes (depending on drying/curing method).
- Prep Time: 20 minutes (Do not skip this!).
- Active Painting: 45–60 minutes.
- Difficulty Level:Intermediate.
- Why? While painting the base color is beginner-friendly, the “icing” line work requires control over your brush pressure and product viscosity. However, because cookies are naturally imperfect, this design is very forgiving compared to geometric French tips.
- Cost Efficiency Analysis:
- Salon Cost: ~$95 (including tip).
- DIY Cost per Manicure: ~$4.50 (amortizing the cost of bottles).
- Total Savings: Over $90 per session.
Step-by-Step Instructions
Here is exactly how we execute gingerbread nails in the salon, broken down so you can replicate it at home.
Step 1: Architectural Prep
Great art crumbles on a bad foundation. Start by pushing back the eponychium (often mistaken for the cuticle) and removing the non-living tissue from the nail plate. Use a 180-grit buffer to gently etch the surface, removing the shine.
- Nail Tech Secret: Cleanse the nail plate with pure alcohol or a dehydrator to remove natural oils. This ensures the chemical bonds of the polish adhere directly to the keratin, preventing premature lifting at the sidewalls.
Step 2: The Structure Layer
Apply your base coat. If you are using gel, you want to create a “slip layer” and then drop a bead of gel near the cuticle, guiding it down to form a slight apex (the highest point of the nail structure). This adds strength.
- Nail Tech Secret: Flip your hand upside down for 10 seconds before curing. Gravity will help the product self-level into a perfect, smooth curve, reducing the need for filing later.
Step 3: Baking the Base (Color Application)
Apply two thin layers of your toasted caramel or gingerbread color. Avoid thick layers! Thick layers of gel lead to incomplete polymerization (undercured gel), which is the leading cause of contact dermatitis. For regular polish, thick layers cause bubbling.
- Application Tip: Bring the color close to the cuticle but leave a hair-thin gap so you don’t flood the skin. Cure (60 sec) or let dry completely between coats.
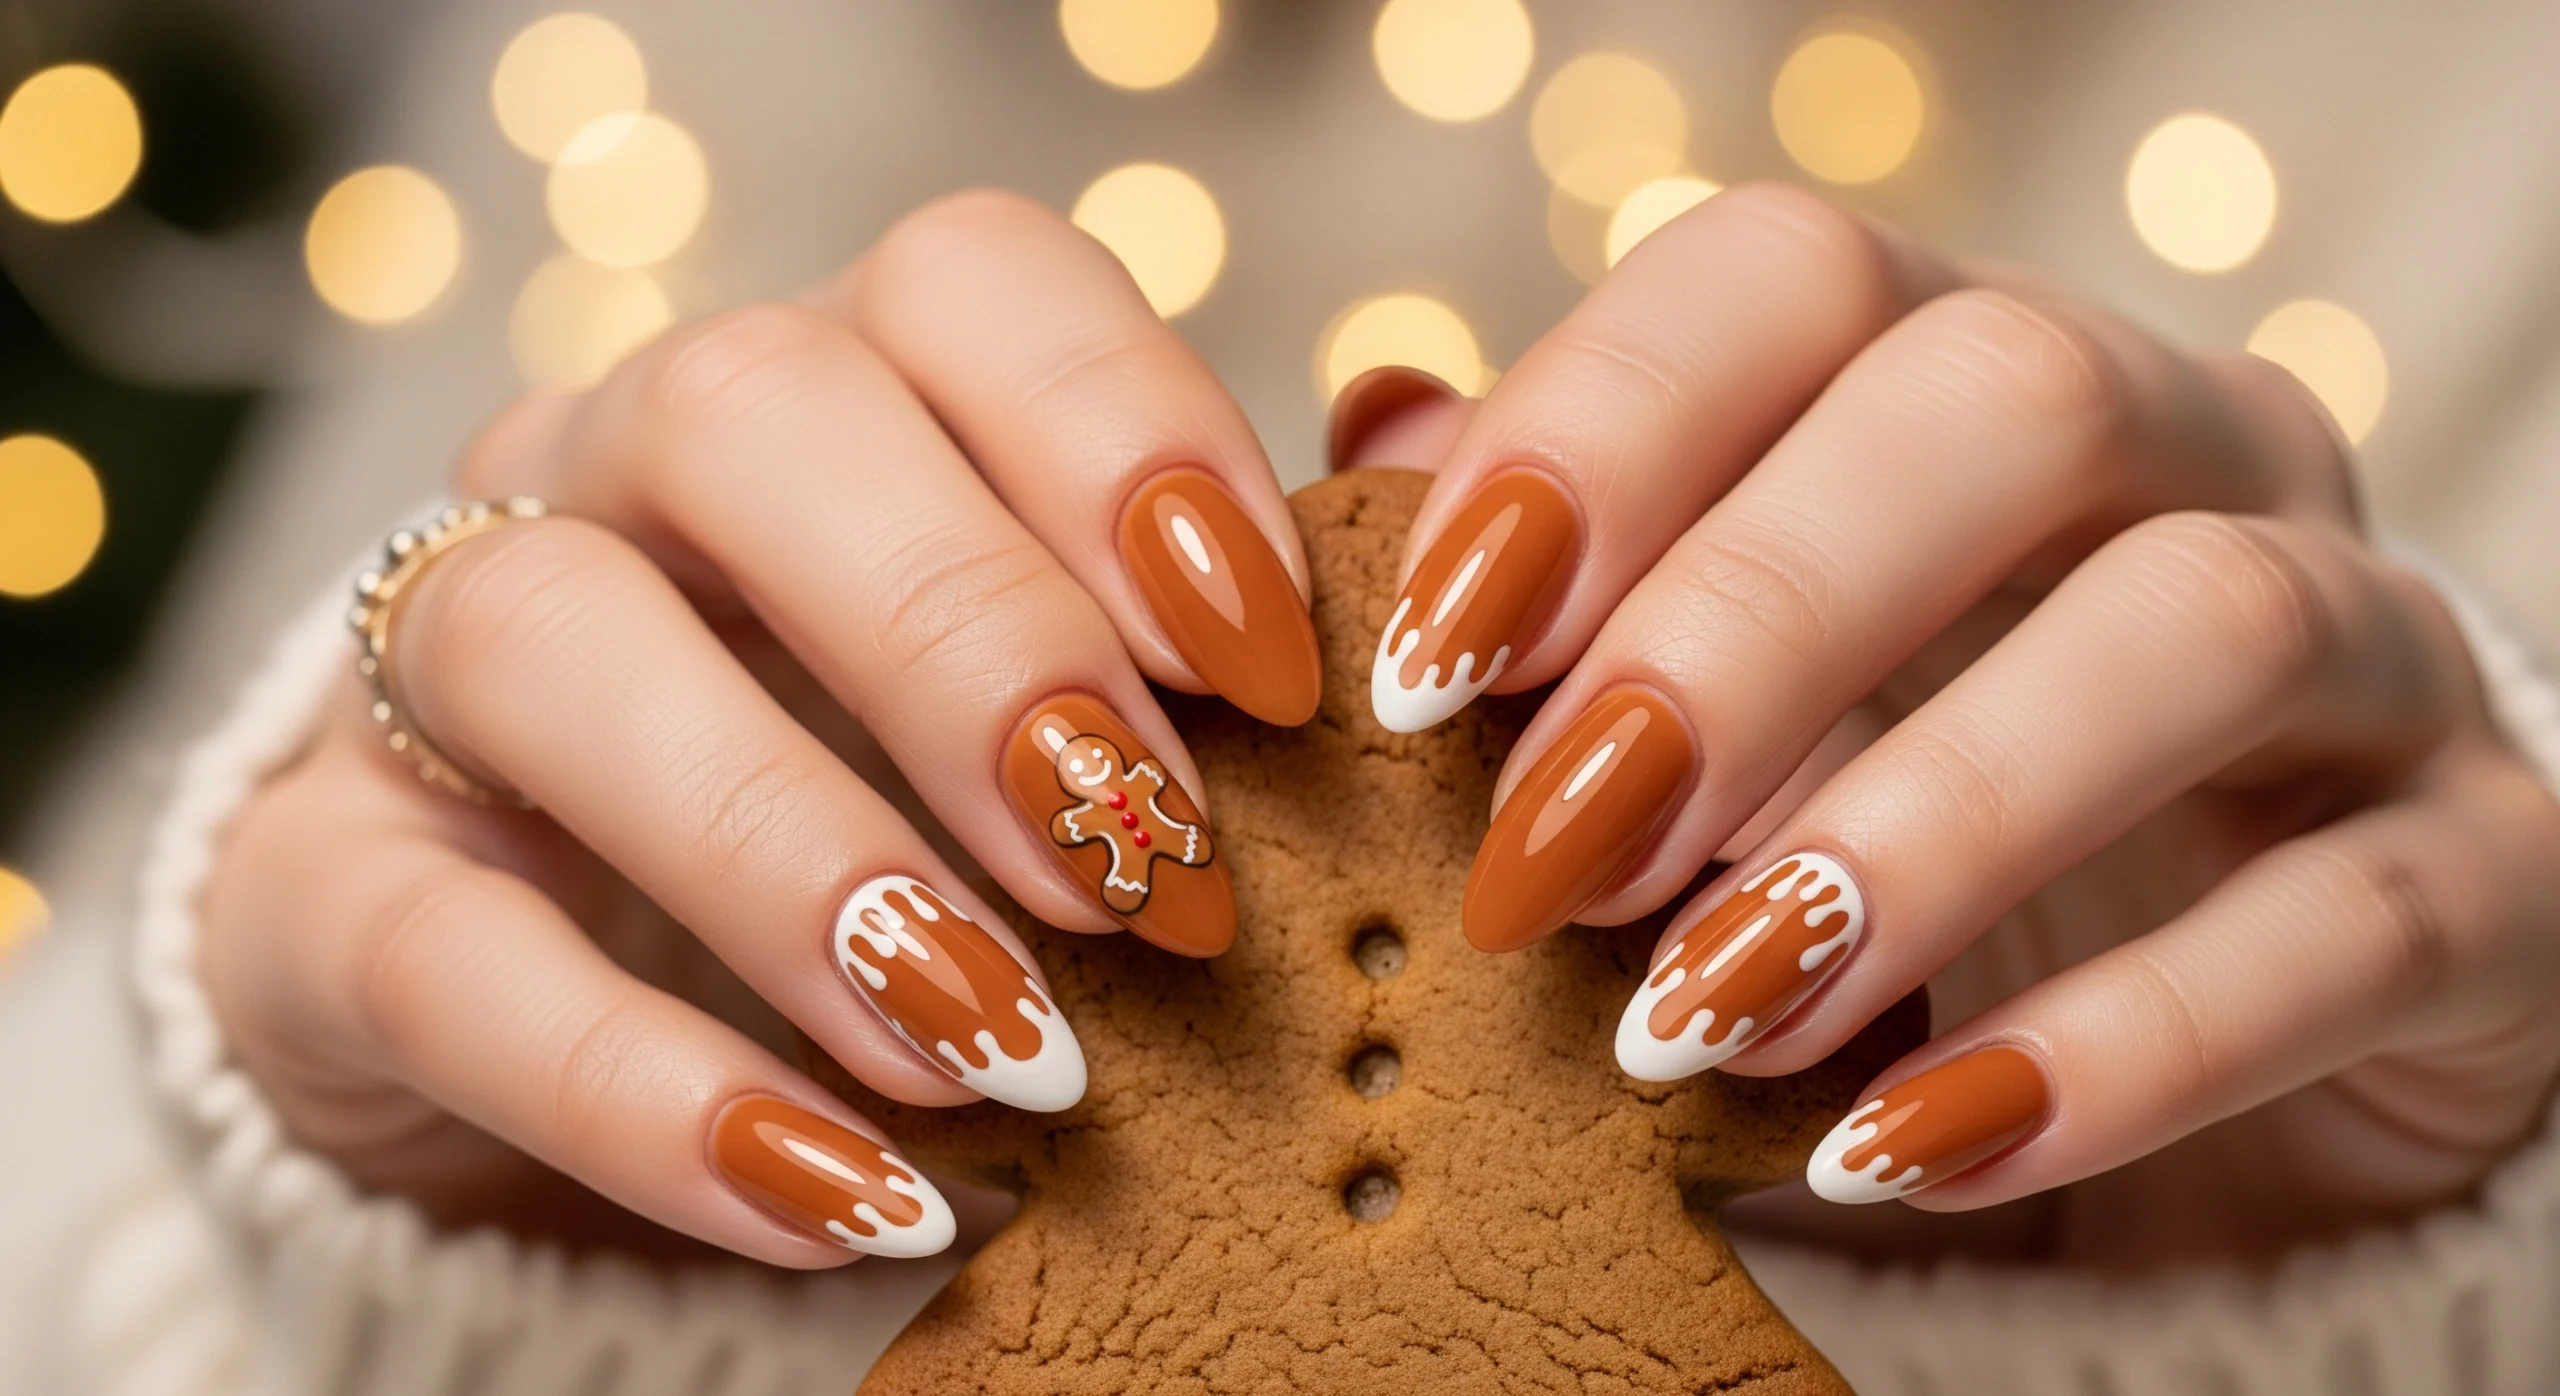
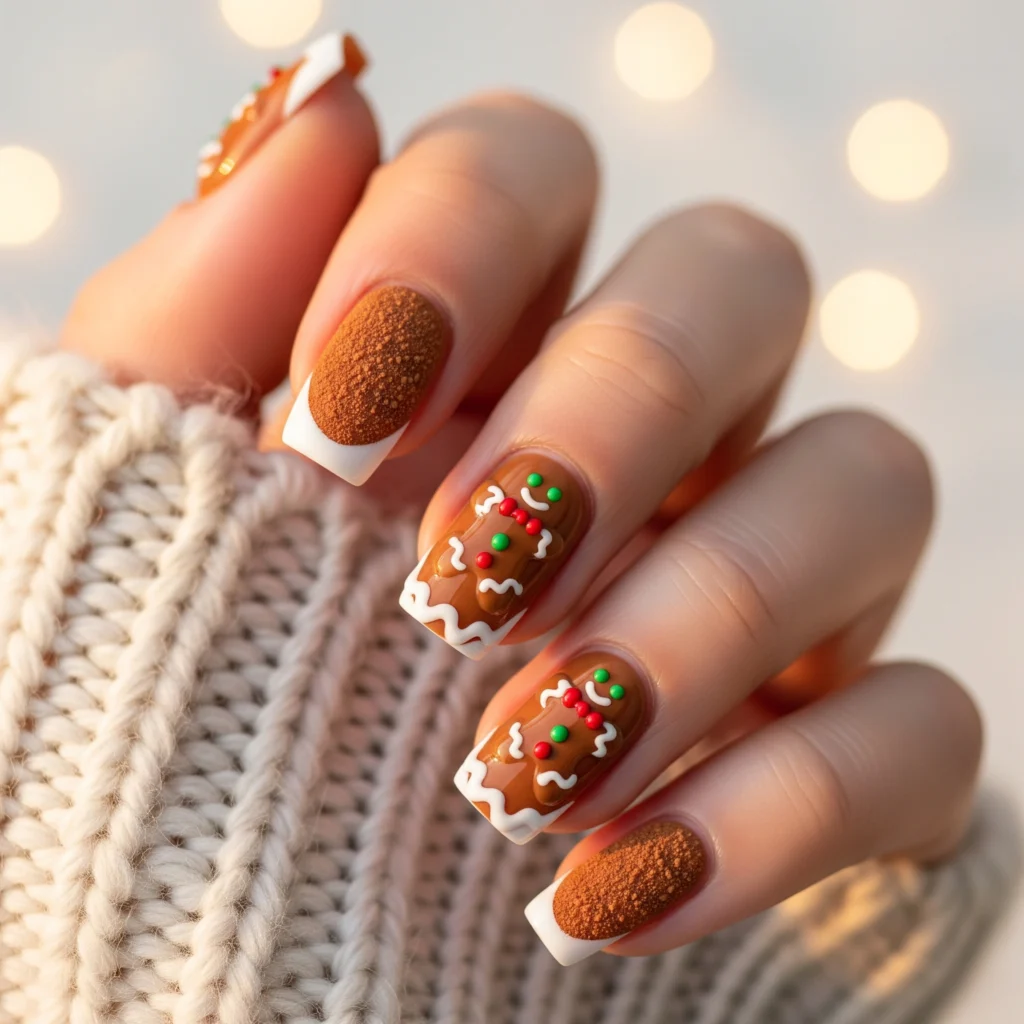
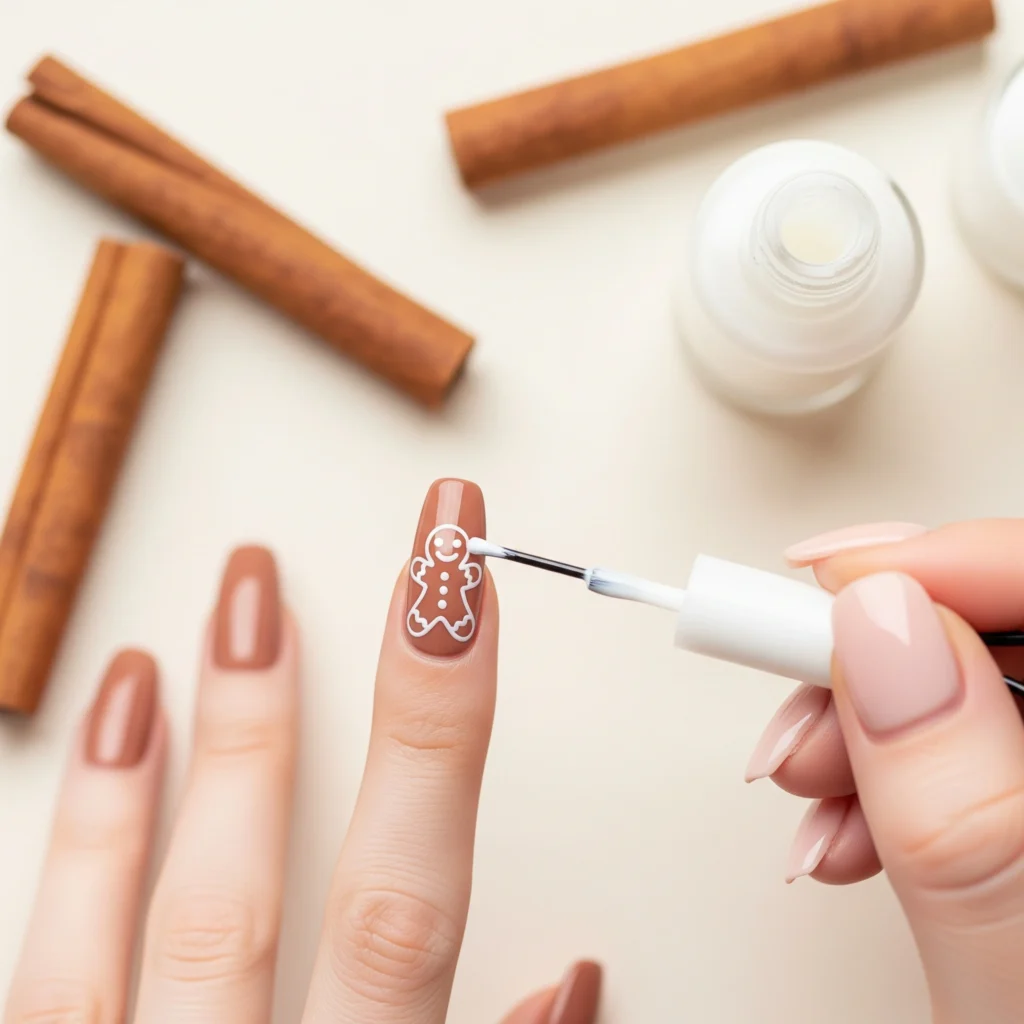
Step 4: Piping the Icing (The Design)
This is where the magic happens. Using your 9mm liner brush or DIY tool, pick up a bead of white polish.
- Technique: To paint the squiggly “icing” trim on the tips or cuticle line, do not press the brush down. Instead, drag the bead of polish over the nail, letting the product flow off the tip like a fountain pen.
- The Gingerbread Man: Start with a circle for the head (using a large dotting tool). Then, use the liner brush to pull a triangle shape down for the body.
- Nail Tech Secret: If using gel, flash cure (cure for 10-15 seconds) after you finish the gingerbread silhouette but before adding the details. This “freezes” the white polish so it doesn’t bleed into the buttons you add next.
Step 5: Buttons and Expressions
Using your smallest dotting tool (or bobby pin), add two black dots for eyes and three colored dots for buttons.
- Pro Insight: Keep the dots small. The viscosity of polish makes dots spread slightly as they settle. A tiny dot now will look perfect in 30 seconds. If they spread too much, they will lose definition.
Step 6: The Sealer (Top Coat)
Apply your top coat. This is arguably the most critical step for longevity.
- Nail Tech Secret: You must cap the free edge. This means running the brush horizontally along the very tip of your nail to wrap the color in a protective clear seal. This prevents water from entering between the polish and the natural nail plate, stopping chips before they start.
- For Gel: After curing the final top coat, wipe the nail with alcohol to remove the inhibition layer (the sticky residue), unless you are using a “no-wipe” top coat.
Durability & Nail Health
How long will your hard work last? Here is what the chemistry says about gingerbread nails wear-time:
- Standard Lacquer: 5–8 days with proper free-edge capping.
- Soft Gel / Soak-off Gel: 14–21 days.
- Dip Powder: 21+ days.
Safety Note: Whether you use gel or lacquer, aim for formulas labeled “5-Free” or “10-Free.” This means they lack harmful chemicals like formaldehyde, toluene, and DBP. Furthermore, if you are using gel, ensure you are removing it via the “soak-off method” (wrapping in acetone for 10 mins). NEVER peel your gel off. Peeling removes layers of your natural nail plate, resulting in thin, sensitive nails that feel like paper—a condition known as onychschizia.
Design Variations & Customizations
This trend is incredibly versatile. Here is how to adapt gingerbread nails to your specific vibe:
- The “Sugar Cookie” Finish:
Use a matte top coat over the base. Immediately after applying the white “icing” lines, sprinkle clear acrylic powder or fine white glitter over the wet design, then cure. Dust off the excess. This creates a realistic, sugary, 3D texture that looks edible. - French Tip Twist:
Instead of a full brown nail, do a “Gingerbread French.” Paint the nail bed a sheer milky nude (high translucency) and paint the free edge in gingerbread brown with white icing drizzles. This elongates the fingers, making it perfect for Almond or Stiletto shapes. - The Minimalist:
Paint 4 fingers solid brown, and place one tiny gingerbread man on the accent nail (ring finger). This is great for office settings where full art might be too loud. - Shape Recommendations:
- Square/Squoval: Best for the full “cookie” look (mimics a baking sheet).
- Almond: Best for the French Tip variation.

Style Pairings
You have the nails; now, how do you style them? Gingerbread nails act as a warm neutral, making them surprisingly easy to pair.
- Jewelry: This manicure screams for Gold Vermeil. The warm yellow tones in the gold bring out the rich cinnamon undertones of the brown polish. Silver can look a bit stark against this palette.
- Wardrobe: Pair this look with the “Winter Arc” trending aesthetics: oversized chunky cable-knit sweaters in cream or beige, leather trenches, and cashmere scarves.
- Makeup: Lean into the “Latte Makeup” trend. Bronzy eyes, brown liner, and a terra-cotta lip will make your manicure feel like part of a cohesive total look.
Common Manicure Mistakes to Avoid
As an educator, I see students make the same errors repeatedly. Here is how to troubleshoot gingerbread nails before you start:
- Flooding the Cuticle:
- The Issue: Paint touching the skin leads to immediate lifting. As the nail grows, that lip catches on hair and clothes.
- The Fix: Leave a hairline gap between the polish and the skin. If you flood it, use your angled brush dipped in acetone to clean it before curing or drying.
- Product Pooling at the Sidewalls:
- The Issue: Gravity pulling the gel to the sides makes the nail look wide and bulky.
- The Fix: Work one or two fingers at a time if you are a beginner, flashing curing them to lock the gel in place before moving to the next finger.
- Wrinkled Polish:
- The Issue: This happens when the pigment is too dense and the light cannot penetrate the layer to cure the bottom. This is common with dark brown shades.
- The Fix: Apply three paper-thin layers rather than two thick ones. Thin layers cure evenly.
Aftercare & Maintenance
To keep that “fresh out of the oven” look for weeks:
- Hydrate the Eponychium: Apply a high-quality Jojoba-based cuticle oil at least twice a day. Jojoba has a molecular structure similar to natural sebum, allowing it to penetrate the polish and keep the nail plate flexible, which prevents cracking.
- Wear Gloves: Water is the enemy. Nails are porous (like a sponge); when they soak up water, they expand. When they dry, they shrink. This expansion/contraction cycle breaks the bond with the polish. Wear gloves for dishes and showers if possible.
- Avoid Tips: Do not use your nails as tools (no opening soda cans!). Use the pads of your fingers.
Conclusion
Gingerbread nails are more than just a holiday trend; they are a sophisticated, warm, and fun way to embrace the season without relying on clichéd bright red glitter. By controlling your viscosity, mastering the “floating” brush technique for your icing lines, and prioritizing nail prep, you can achieve a durable, salon-quality set that withstands the winter elements.
We want to see your creations! Did you go for the matte sugar finish or the glossy glaze?
Tag us on Instagram @TheNailLook with your recreations for a chance to be featured in our next trend report! Drop a comment below telling us: Team Matte or Team Glossy?
FAQs
Q: Can I do this design on acrylics or soft-gel tips?
A: Absolutely. Gingerbread nails work on natural nails, acrylics, Gel-X, or press-ons. In fact, the rigid structure of acrylics provides a fantastic, smooth canvas for the line work.
Q: Why is my white line art chipping off the base color?
A: This is usually an adhesion issue between layers. If you waited too long between the base color and the art, or if you touched the surface with your fingers, oils could be preventing the bond. Alternatively, you may not have sealed the art with a thick enough layer of top coat.
Q: I’m struggling with painting with my non-dominant hand. Any tips?
A: The “moving canvas” technique is a game changer. Keep your brush hand steady and planted on the table. Instead of moving the brush, move the finger you are painting underneath the brush. It provides much more control for beginners.
Q: Can I use a white Sharpie for the details instead of polish?
A: Technically, yes! This is a great hack. Use a matte top coat over your brown base (marker doesn’t stick to gloss), draw your design with a fine-point Sharpie, let it dry for 5 minutes, and then very gently float a clear top coat over it. Be careful not to drag the brush hard, or the ink will smear.