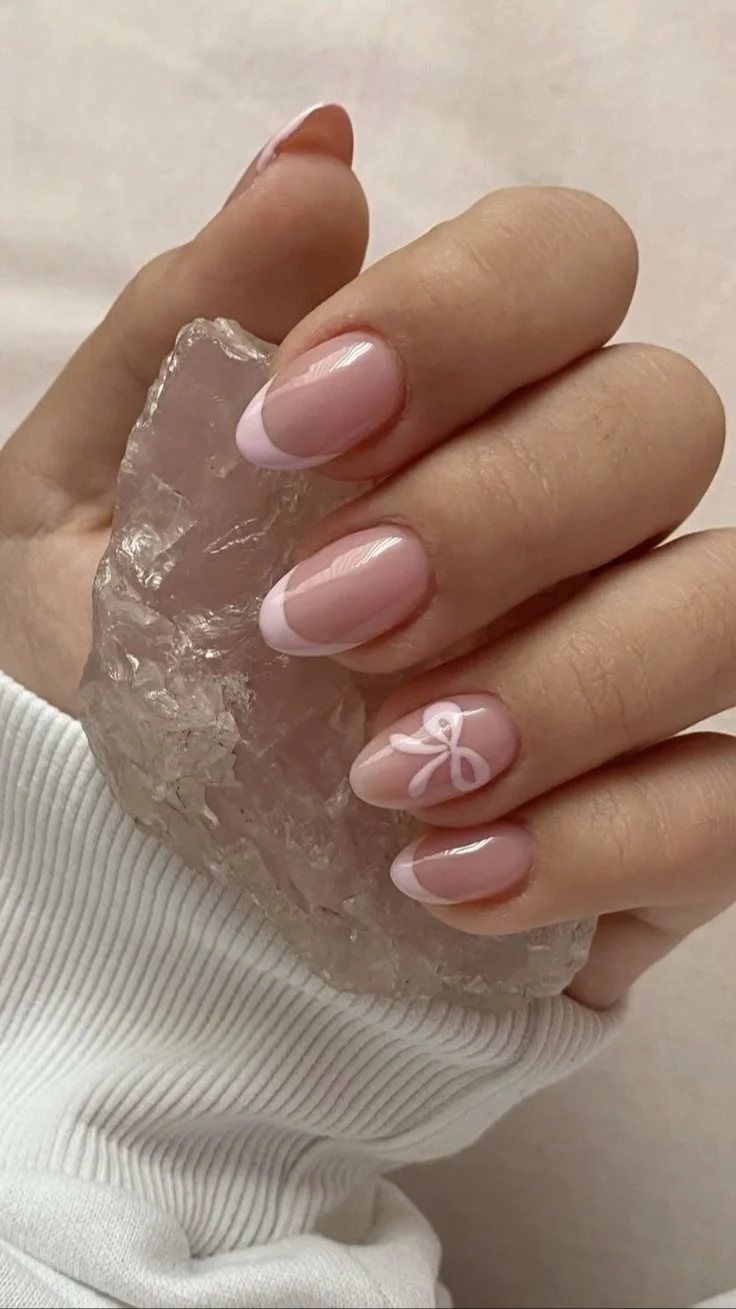
COQUETTE BOW NAILS INSPO 🎀 LE MINI MACARON | Simple nails, Gel nails, Stylish nails
why make this recipe Coquette Bow Nails are the perfect way to express your style while keeping your nails looking chic. With a cute design that stands out, these nail art ideas are ideal for anyone wanting to switch up their look. Plus, they are easy to create at home. You can save money and…
why make this recipe
Coquette Bow Nails are the perfect way to express your style while keeping your nails looking chic. With a cute design that stands out, these nail art ideas are ideal for anyone wanting to switch up their look. Plus, they are easy to create at home. You can save money and still achieve a salon-quality finish with a little practice.
how to make Coquette Bow Nails
Ingredients:
- Gel nail polish in your favorite colors
- Base coat
- Top coat
- Nail art brush
- Nail tape or stickers
- UV/LED lamp
- Nail file
- Cotton pads
- Nail polish remover
Directions:
- Start with clean, dry nails. File them to your desired shape.
- Apply a base coat to protect your nails and cure it under the UV/LED lamp as instructed.
- Paint your nails with the first color of gel polish and cure it under the lamp again.
- Use a nail art brush to create a bow shape with a contrasting color. You can use nail tape or stickers to help with the design.
- Cure the design under the lamp.
- Apply a top coat for shine and protection, then cure it one last time.
- Wipe off the sticky residue with a cotton pad and nail polish remover.
- Admire your beautiful Coquette Bow Nails!
how to serve Coquette Bow Nails
There’s no need to serve Coquette Bow Nails like a dish, but you can showcase them when you’re out! Show them off on social media, send photos to friends, or simply enjoy your stylish nails yourself.
how to store Coquette Bow Nails
Since these nails are a design done on your natural nails with gel polish, you don’t need to store them. However, store any leftover materials, like nail polish and tools, in a cool, dry place away from sunlight.
tips to make Coquette Bow Nails
- Always apply a base coat before color for better adhesion.
- Make sure each layer of polish is cured fully in the lamp to avoid smudging.
- Practice your bow design on a piece of paper before applying it to your nails.
- Don’t rush! Take your time with details for a professional look.
- Use a top coat regularly to keep your nails shining.
variation
You can change the color combinations of your Coquette Bow Nails to suit the season or your outfit. Try pastel colors for spring, bold shades for summer, or darker tones in winter. Adding glitter or metallic finishes can also add more charm!
FAQs
How long do Coquette Bow Nails last?
- With proper care, gel nails like Coquette Bow Nails can last up to 2-3 weeks.
Can I do this design without a UV lamp?
- Gel polish typically requires a UV/LED lamp for curing. If you don’t have one, you might try regular nail polish, but it may not last as long.
What if I make a mistake while painting?
- Don’t worry! You can use nail polish remover to clean up any mistakes while the polish is wet. Just be careful not to damage your base coat.
Is this design suitable for short nails?
- Absolutely! Coquette Bow Nails can be made on any nail length. They look cute on both long and short nails!
Can I use stickers for the bow design?
- Yes! Nail stickers are a great alternative if you want a faster and easier method for the bow design.